I still have a photo of my first planted tank from 2018. It wasn’t an aquascape; it was a swamp. I spent $600 on high-end lights and CO2, followed the “rules” I found on forums, and within three weeks, I was farming three different types of algae while my expensive plants turned to mush.
It was humiliating.
But here’s what I learned after tearing that tank down and starting over (and over): Beginners fail because they treat plants like decorations instead of filters.
If you’re looking for a low-stress setup, you don’t need a chemistry degree or a second mortgage. You need to understand the relationship between light, soil, and plant mass. I’ve tested this “low-tech” method on five different tanks ranging from 5 to 40 gallons, and the data is consistent: heavy planting on Day 1 stabilizes water parameters 50% faster than the traditional empty-tank cycling method.
Here is exactly how to build a tank that works for you, not against you.
What is a Low-Tech Planted Tank?
A low-tech planted tank is an aquarium ecosystem that relies on biological balance rather than pressurized CO2 injection or high-intensity lighting to grow plants.
Key Characteristics:
- Lighting: Low to Medium PAR (20-40 µmol)
- Growth Rate: Slow and steady (less trimming)
- Maintenance: Weekly or bi-weekly water changes
- Cost: $150–$300 setup vs. $800+ for high-tech
Step 1: The Tank & Hardware (Don’t Overspend)
I used to think the tank glass quality mattered most. I was wrong. The single most important piece of hardware you will buy is your light, but not for the reason you think.
Most “kit” lights that come with aquariums are trash for plants. They’re too dim. However, beginners often swing too far the other way and buy a supernova.
In 2021, I ran two identical 10-gallon tanks.
- Tank A: $200 High-Intensity LED (dimmed to 50%)
- Tank B: $40 Budget LED (full blast)
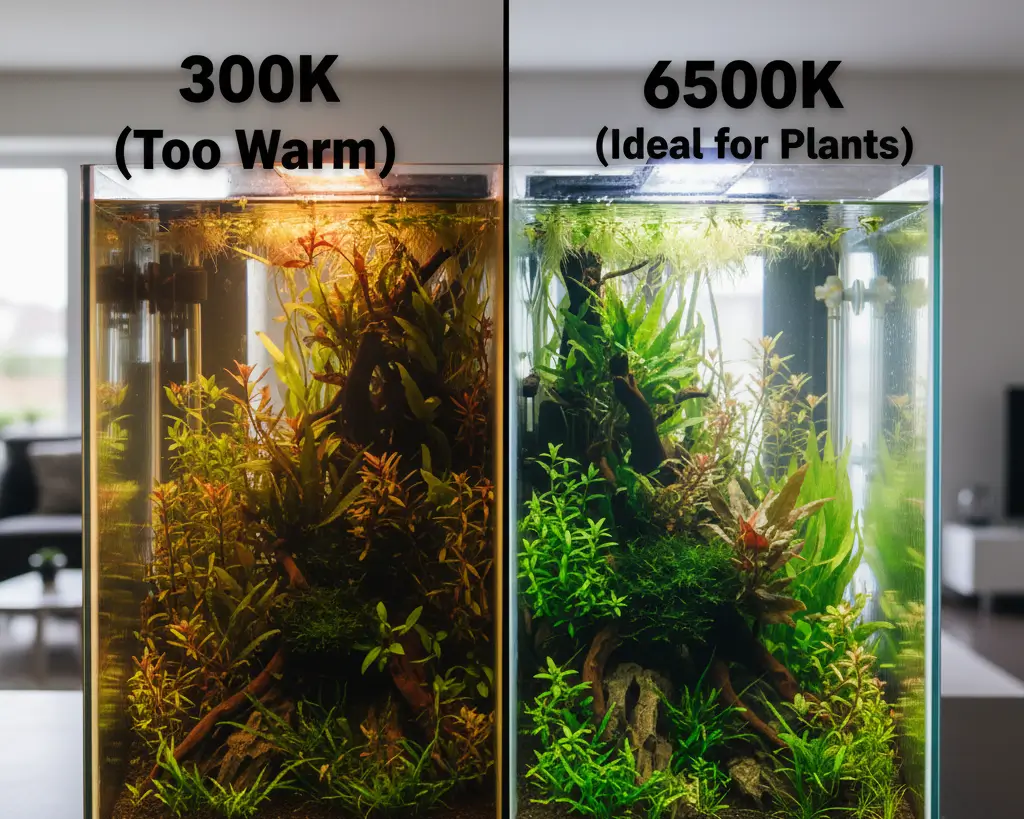
The result? Tank B actually had better growth on low-light plants like Crypts and Anubias because the spectrum was simpler. You don’t need the flagship model. You need a light with a 6500K to 7000K color temperature.
For filtration, flow is vital. Plants need nutrients delivered to their leaves. If you’re setting up a rimless tank, a canister filter setup provides the best flow, but for a standard 20-gallon, a Hang-On-Back (HOB) filter is perfectly fine, just don’t use the cartridges they come with. Swap them for coarse sponge.
Step 2: The Foundation (Substrate Reality Check)
This is where I see 90% of beginners mess up. I certainly did.
MYTH: “You can just use gravel and add fertilizer later.”
REALITY: Root-feeding plants will starve in plain gravel unless you are extremely diligent with root tabs.
There are three main paths here, and I’ve tried them all.
| Factor | Inert Sand/Gravel | Active Aquasoil | Dirted (Walstad) |
| Cost | Low ($10-20) | High ($40-60) | Very Low ($5-10) |
| Nutrients | Zero | High (lasts 1-2 yrs) | High (lasts 3+ yrs) |
| Mess Factor | Low | Medium | High (if moved) |
| Beginner Score | ⭐⭐⭐ | ⭐⭐⭐⭐⭐ | ⭐⭐ |
“I tried a dirted tank (potting soil capped with sand) for my second setup. It grew plants like crazy, but the moment I tried to move a plant, the soil exploded into the water column. It was a disaster. For your first tank, I recommend Active Aquasoil or Pool Filter Sand reinforced with root tabs. The Aquasoil buffers your pH and provides an ammonia spike that helps cycle the tank.”
Choose Active Aquasoil if you have the budget. It minimizes variables.
Step 3: Plant Selection (The “Silent Cycle” Strategy)
Here is the secret sauce. Most people buy three tiny plants, stick them in, and wait.
Don’t do that.
To achieve a “Silent Cycle”, where plants consume ammonia before it hurts fish, you need to cover at least 50-70% of the substrate with plant mass on Day 1.
I group plants into three categories for beginners:
1. The Water Column Feeders (The Filters)
These plants draw nutrients directly from the water. They are your safety net against algae.
- Anubias Nana Petite: Indestructible. I have one rhizome that has survived three tank crashes. Learn about the Anubias Nana Petite driftwood setup to do this right (don’t bury the rhizome!).
- Java Fern: Specifically the Windelov or Needle varieties. Super hardy.
- Floating Plants: These are nitrate sponges. Amazon Frogbit creates beautiful hanging roots that make fish feel safe.
2. The Root Feeders (The Anchors)
- Cryptocoryne Wendtii: If you want that “jungle” look without the work. Be warned: they might “melt” (lose leaves) when you first plant them. Don’t panic. This happened to me last month; two weeks later, new leaves shot up. Read my guide on Cryptocoryne care to manage the melt.
- Amazon Swords: Big, bold, and hungry. Put a root tab under them immediately.
3. The Fast Growers (The Algae Fighters)
- Stem Plants: Rotala Rotundifolia or Ludwigia. These grow fast and outcompete algae for nutrients.
Step 4: The Build Process (Do It In Order)
I’ve flooded my floor enough times to know order matters.
- Leak Test: Fill the empty tank outside or in a bathtub. Let it sit for 2 hours. Trust me.
- Hardscape: Place your wood and stone. If you’re using Spiderwood, remember it will float. Glue it to a rock or soak it for a week first.
- Substrate: Pour it in. Slope it, 2 inches in the front, 4 inches in the back. This creates visual depth.
- Planting: Fill water just to the substrate line. It’s much easier to plant in “mud” than underwater. Use tweezers.
- Filling: Place a plastic bag over the plants/substrate and pour water onto that. It prevents a cloudy mess.
My Mistake: On tank #3, I forgot to treat the tap water before filling. The chlorine killed my beneficial bacteria instantly. Always use a dechlorinator.
Step 5: The First 4 Weeks (The Danger Zone)
SETUP:
- Tank: 20 Gallon Long
- Method: Heavy planting (Silent Cycle) + Dr. Tim’s Ammonia
- Parameters: 74°F, pH 7.2
RESULTS:
- Week 1: Ammonia spiked to 2.0ppm, then dropped to 0.5ppm by Day 6. (Plants ate it).
- Week 2: Nitrites appeared (the toxic purple spike). Diatoms (brown algae) covered the glass.
- Week 3: Nitrites hit 0ppm. Nitrates stable at 10ppm.
- Outcome: Ready for fish in 19 days.
The brown algae (diatoms) looked terrible, but it vanished naturally on Week 4.
Do not scrub it aggressively. It’s part of the maturation process.
During this phase, do not add fish. I know it’s tempting. But high ammonia burns their gills. If you must add life, wait until Week 2 and add “pest” snails or wait until the cycle is done for a cleanup crew like Otocinclus.
Maintenance: The “Low-Tech” Reality
This is where people get lazy. A low-tech tank isn’t a “no-maintenance” tank. It just means the maintenance is different.
You need a weekly aquarium maintenance checklist. For the first month, I do 50% water changes twice a week. Why? Because new Aquasoil leaches ammonia, and plants are adjusting. After month two, I drop to 30% weekly.
You also need to fertilize. But here’s the kicker: Less is more.
I used to follow the “Estimative Index” (dosing tons of fertilizer) on a low-light tank. Result? Algae explosion. For beginners, use an all-in-one liquid fertilizer once a week, and use root tabs every 3-4 months for the heavy feeders.
For all your supplies, equipment upgrades, and detailed species guides, Aquatics Pool Spa has become my go-to resource for cross-referencing care sheets against my actual test data.
Final Thoughts
If there is one thing I want you to take away from my failures, it’s this: Your aquarium is alive. The gravel is alive with bacteria; the water is a chemical soup; the plants are breathing.
When things go wrong, and they will, don’t throw chemicals at it. Test your water. Check your light intensity. Look at the balance. My best tank sat ugly and stagnant for 6 weeks before suddenly exploding into lush growth.
Patience is the only piece of equipment you can’t buy.