I still remember the sound of my first canister filter priming. It sounded like a tractor gargling gravel.
Ten minutes later, I was frantically throwing towels on my hardwood floor because I hadn’t double-checked the O-ring seal. But the real disaster wasn’t the water on the floor, it was what happened inside the tank three weeks later. Black Beard Algae everywhere. Why? Because I followed the manufacturer’s instructions for media setup instead of customizing it for a planted ecosystem.
If you are setting up a canister filter for a planted tank, throw the “standard” manual away. Planted tanks require a specific balance of biological filtration and gentle, CO2-rich flow that standard setups ignore.
Here is exactly how to set it up, based on 15 years of tweaking flow rates and measuring dissolved oxygen levels.
What is the Correct Media Order for Planted Tanks?
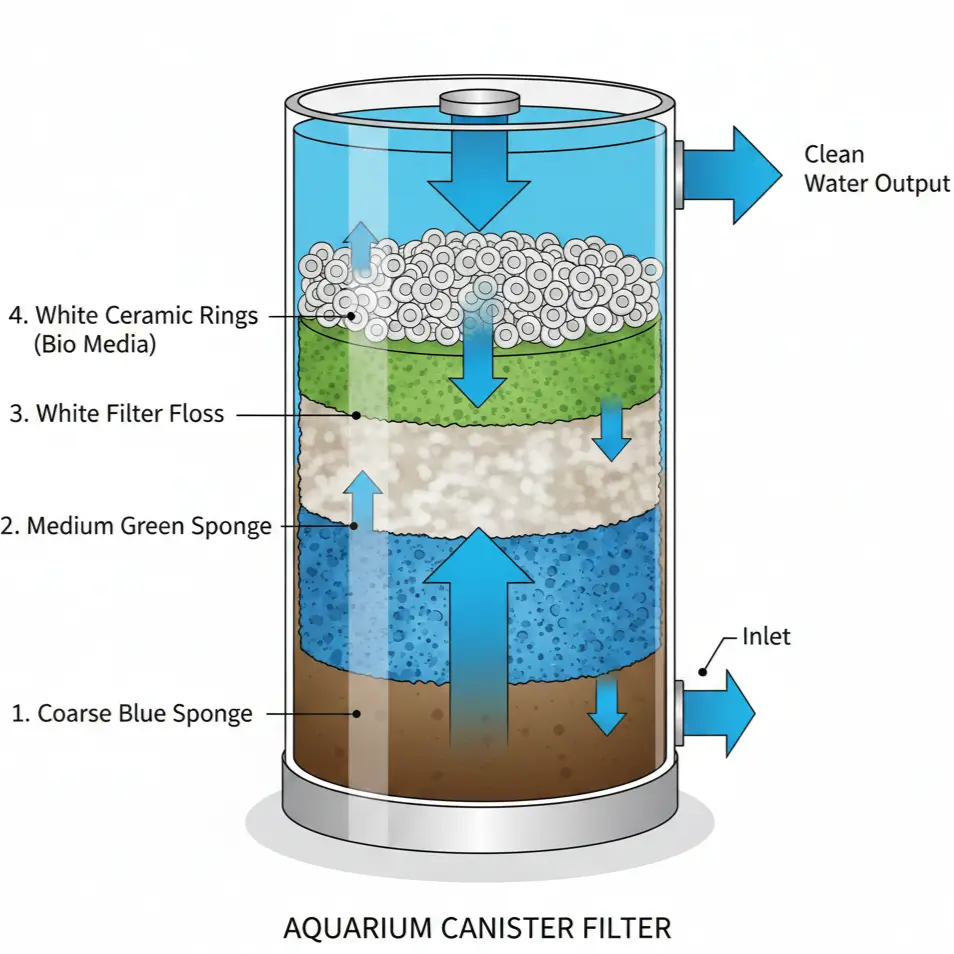
The golden rule of canister filtration is water flows from Mechanical → Biological → Chemical.
For a planted tank specifically, this hierarchy is non-negotiable. If you put fine filter floss before your coarse sponge, your flow rate will die in 5 days. If you put chemical filtration (like carbon) at the bottom, it clogs before it works.
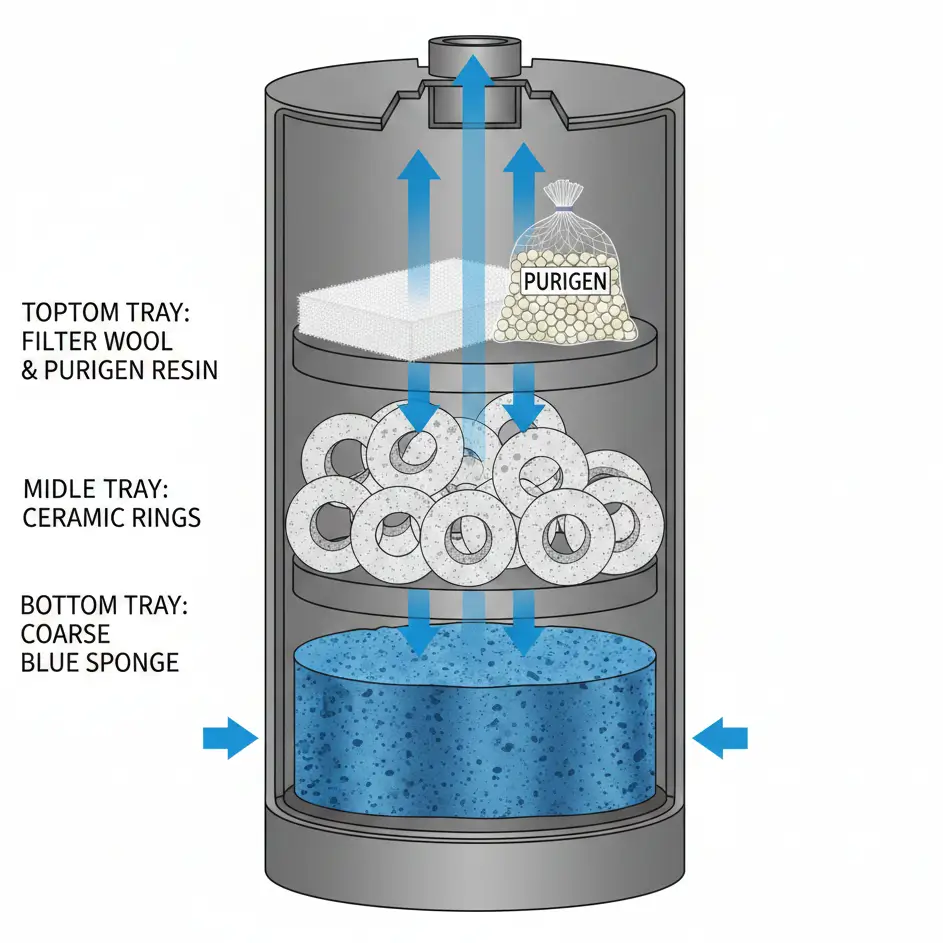
The Optimal Stack (Bottom to Top for most brands):
- Coarse Sponge: Catches big debris (leaves, uneaten food).
- Medium Sponge: Polishes water without clogging rapidly.
- Biological Media: Sintered glass or ceramic rings (high surface area).
- Fine Filter Floss (Polishing): Catches micro-particles (replace monthly).
- Chemical Filtration (Optional): Purigen (never Carbon).
Why this order?
Water hits the coarse stuff first. If the biological media gets clogged with sludge (mulm), the bacteria die from oxygen starvation. You are protecting your bacteria colony with the sponges.
Source: Dr. Timothy Hovanec’s research on nitrification efficiency emphasizes that Nitrospira colonies require specific oxygen thresholds, which drop significantly in clogged media beds (Hovanec, 1998).
The “Flow Paradox”: Why Manufacturer GPH is a Lie
Here is the thing that frustrates me the most about aquarium packaging.
You buy a filter rated for “400 Gallons Per Hour (GPH).” You think, “Great, that’s 20x turnover for my 20-gallon tank!”
Wrong.
Manufacturer ratings are measured with zero head pressure (no hose length) and zero media (empty bucket). Once you fill that canister with dense ceramic rings, add 4 feet of tubing, and lift the water back up to the tank rim, physics takes over.
SETUP:
- Filter: Popular European Canister (Rated 265 GPH)
- Tank: 29 Gallon Standard
- Head Height: 4 feet (cabinet to rim)
RESULTS:
- Empty Canister: 258 GPH (Near rating)
- Full Media (Clean): 165 GPH (37% drop)
- Full Media (3 weeks dirty): 112 GPH (57% drop)
Always buy a filter rated for a tank 2x larger than yours. If you have a 30-gallon tank, buy a filter rated for a 60-gallon. You can always dial back flow; you cannot create it.
Carbon vs. Purigen: The Planted Tank Contradiction
I used to run activated carbon in every single tank. It’s what the pet store employee told me to do. “It makes the water crystal clear,” they said.
And they were right. But my Rotala Rotundifolia Red looked pale, and my iron test kits always read zero.
The Reality: Activated carbon is indiscriminate. It adsorbs tannins and odors, yes, but it also strips out chelated iron and organic fertilizers your plants need.
What to do instead:
Use Seachem Purigen. It’s a synthetic resin that targets organic nitrogenous waste (fish poop breakdown products) but largely ignores trace minerals. I’ve run Purigen in high-tech setups for years with no impact on my fertilization regime.
Exception: If you are trying to remove medication after treating Ich (White Spot Disease), use Carbon for 3 days, then trash it.
Hardware Setup: Intake and Output Placement
This is where 90% of people get it wrong, and it leads to “dead zones” where algae thrives.
In a planted tank, we want a circular flow pattern. The water should shoot across the top, hit the far glass, travel down the front, and return across the substrate to the back. This ensures CO2 is distributed to carpet plants like Monte Carlo.
The Hardware Checklist
Before you start connecting hoses, ensure you have the right components. Standard intake strainers are often too large or ugly for aquascapes. I highly recommend upgrading to glass or stainless steel lily pipes if your budget allows. For a comprehensive breakdown of what you need, check our guide on canister filter setup planted tanks, which covers specific tube diameters and connector types.
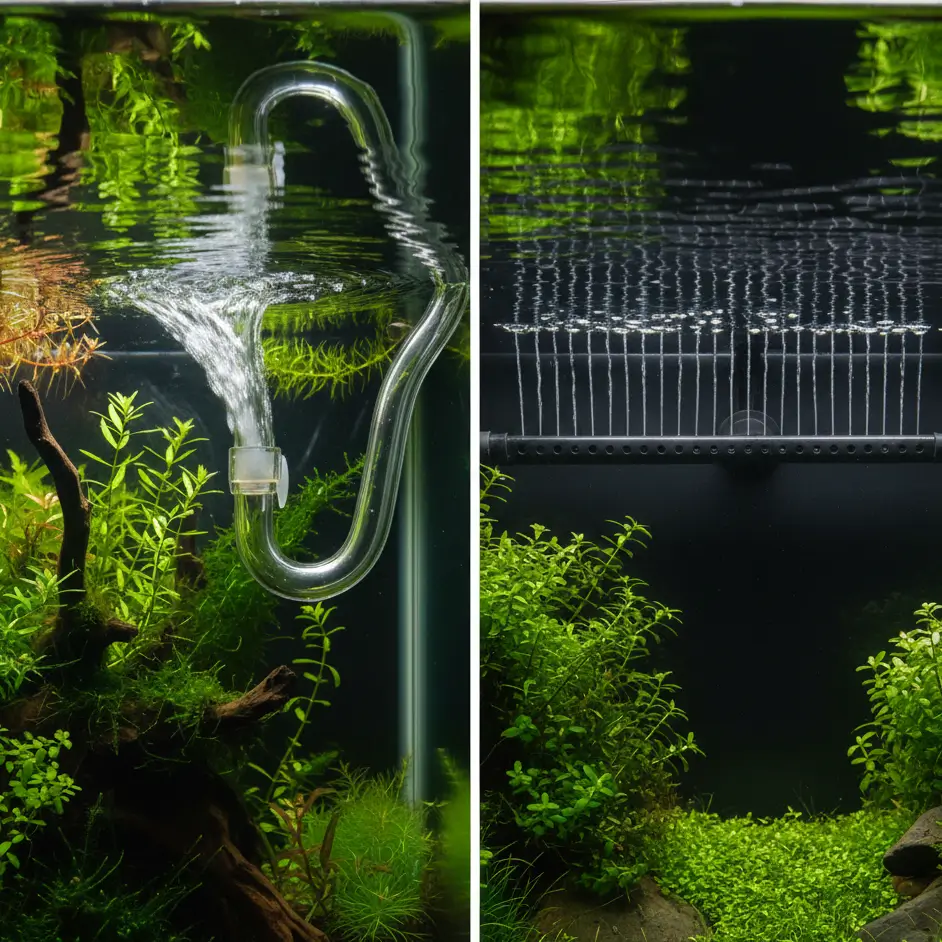
Lily Pipes vs. Spray Bars
| Feature | Lily Pipe (Spin Type) | Spray Bar | My Verdict |
| Flow Velocity | Low / Gentle | High / Direct | Lily Pipe wins for Bettas/Shrimp |
| CO2 Distribution | Excellent (Circular) | Good (Linear) | Spray Bar wins for long tanks (>4ft) |
| Aesthetics | Invisible (Glass) | Visible (Plastic) | Lily Pipe wins for Aquascaping |
| Maintenance | High (Shows algae) | Low (Hidden) | Spray Bar wins for lazy hobbyists |
I broke a $60 glass lily pipe last year while cleaning it. It shattered in my hand. If you are clumsy (like me), buy Stainless Steel pipes. They look industrial and are indestructible. Or, stick to the black plastic spray bar but mount it vertically in the corner to create a gyre.
Priming Without the Headache
Trapped air is the enemy. It makes your filter noisy and can damage the impeller (cavitation).
The “Gravity Feed” Trick:
I wasted hours pumping that little primer button on top of the canister. It rarely works well. Here is the foolproof method:
- Set up the filter completely empty of water.
- Place the intake pipe in the tank (underwater).
- Suck on the output hose (yes, with your mouth, don’t swallow!) until water crosses the tank rim.
- Immediately put the hose in a bucket.
- Gravity will siphon tank water down into the canister, filling it from the bottom up.
- This forces all air out the top.
- Once water flows steadily into the bucket, connect the hose to the filter output and plug it in.
Silence. No rattling.
Maintenance: The “Do Not Touch” Rule
There is a massive misconception that you need to clean your filter monthly.
Please don’t.
Every time you open that canister, you risk damaging O-rings, breaking clips, and most importantly, disturbing the bacterial colony.
My Schedule:
- Monthly: Clean the intake sponge (pre-filter) inside the tank. This prevents the canister from clogging.
- Every 3-4 Months: Open the canister. Rinse sponges in tank water (never tap water, chlorine kills bacteria). Replace the fine filter floss. Leave the bio-media alone.
- Annually: Replace hoses if they are stiff. Lubricate O-rings with silicone grease.
If you notice your flow rate drop significantly (visible by observing Valisneria leaves not swaying), check the hoses first. 80% of flow reduction is gunk in the hoses, not the filter itself.
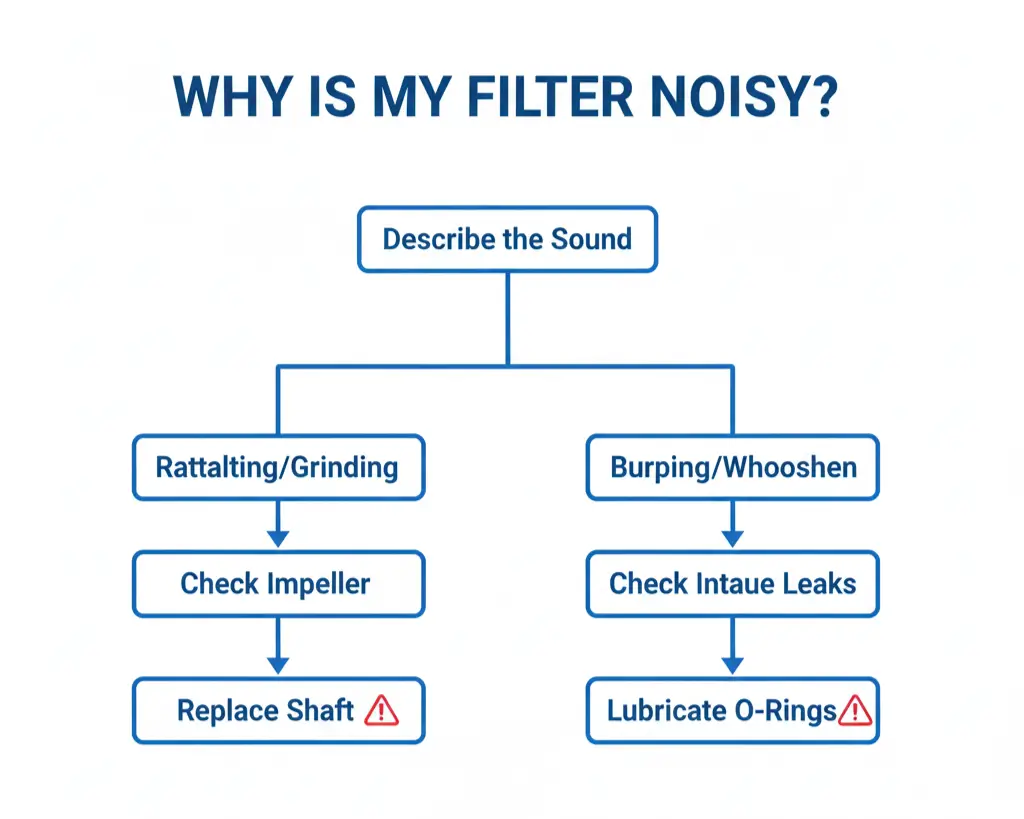
Troubleshooting Common Issues
The “Burping” Sound
If your filter releases bursts of micro-bubbles every few minutes, you have a leak on the intake side. Air is being sucked in through a loose connection. Check the hose clamps where the tubing meets the intake pipe.
Cloudy Water After Cleaning
Did you rinse your media under the tap? If yes, you killed your cycle. You are seeing a bacterial bloom. Add a bottled bacteria starter immediately and test for ammonia using an API Master Test Kit.
If you didn’t use tap water, you likely just disturbed fine silt. Add some extra fine polishing pads for 24 hours.
Myths vs. Reality
MYTH: “Bio-balls are the best biological media.”
REALITY: Bio-balls are designed for wet/dry trickle filters, not canisters. They waste massive amounts of space. Use sintered glass (like Biohome or Matrix) which has 100x the surface area per volume.
EVIDENCE:
Manufacturer surface area data: Bio-balls ~150 m²/m³ vs Sintered Glass ~700+ m²/m³.
MYTH: “You need 10x turnover for planted tanks.”
REALITY: 10x is great for bare-bottom monster fish tanks. For planted tanks, 5x-7x actual turnover is ideal. Too much flow forces plants to grow sideways and off-gasses CO2 too quickly.
People conflate “flow” with “filtration.” You need filtration to process ammonia, but you need flow to move nutrients. These are separate goals. Use a circulation pump if you need more flow, don’t oversize the filter to the point of a whirlpool.
Final Thoughts
Setting up a canister filter for a planted tank is about respecting the biology, not just plumbing the hardware.
Focus on the flow path. Protect your bio-media. And for the love of the hobby, lubricate your O-rings. I learned that last one the expensive way, involving a carpet cleaner rental and a very unhappy spouse.
Get the flow right, and your plants will pearl like crazy. Get it wrong, and you’re just farming algae.