My first Glossostigma attempt in October 2022 was a disaster. Three weeks in, every single runner was growing straight up like tiny green fingers reaching for the surface. It looked nothing like the pristine carpets I’d seen in competition tanks. I blamed the CO2. I blamed the substrate. Turns out, I was wrong about everything.
Glossostigma elatinoides creates dense carpets when light intensity at substrate level exceeds 50 PAR, ideally 70-100 PAR, regardless of CO2 injection. Most failures happen because hobbyists focus obsessively on CO2 while running lights at half the intensity this plant actually needs.
I’ve grown Glossostigma in seven tanks since that first failure, including three simultaneous test setups in early 2024 specifically designed to isolate the variables everyone argues about online. The results surprised me, and they’ll probably surprise you too. This guide covers what I learned, with actual test data, specific parameters, and the planting technique that finally worked after I’d wasted about $200 on plants that melted or went vertical.
What Is Glossostigma Elatinoides? (And Why It’s Not “Beginner-Friendly”)
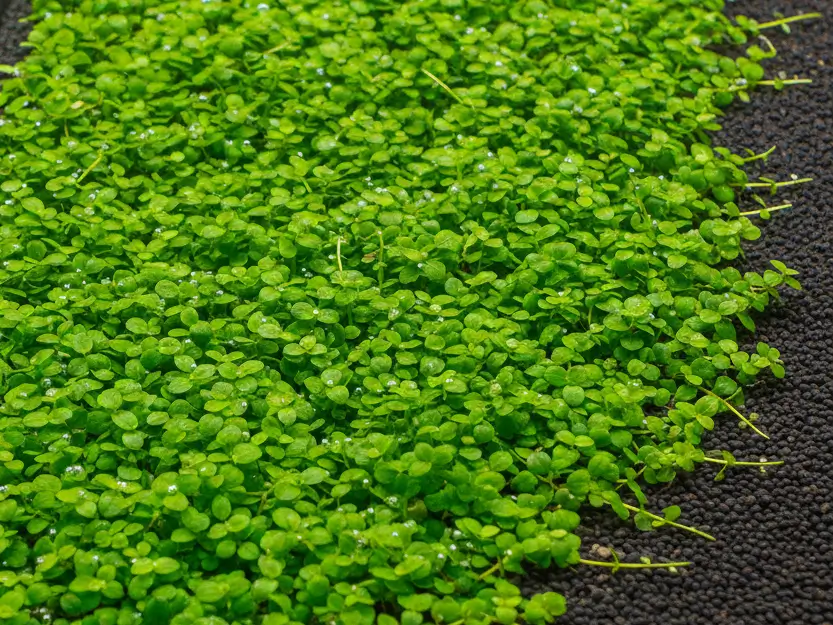
Glossostigma elatinoides (Benth.) Hook.f. 1884 is a small, creeping aquatic plant from New Zealand and Australia that produces the lowest-growing carpets in the aquarium hobby, just 0.5-1 inch (1-3 cm) tall under proper conditions. It spreads via horizontal runners, creating dense green mats across the substrate.
despite what some sellers claim, this plant isn’t beginner-friendly. I’ve watched experienced planted tank keepers struggle with it. The challenge isn’t that Glossostigma is delicate, it’s actually quite hardy once established. The problem is that it has non-negotiable light requirements that most standard aquarium setups don’t meet.
Takashi Amano popularized Glossostigma in the 1990s through his Nature Aquarium style, and his competition-level tanks used lighting setups that delivered 100+ PAR at substrate level. That context matters. When people replicate his aesthetic with budget lights delivering 25-40 PAR, they’re setting themselves up for disappointment.
This plant originates from New Zealand stream margins and wetlands where it receives intense, direct sunlight. In aquariums, it demands conditions mimicking that environment, or it behaves completely differently. If you’re interested in the broader philosophy behind these natural aquascaping approaches, understanding Nature Aquarium principles developed by Amano provides important context.
Why 90% of Glossostigma Carpets Fail (The Myth vs. Reality)
MYTH #1: “Glossostigma absolutely requires CO2 injection”
REALITY: CO2 accelerates growth and makes success easier, but light intensity is the determining factor. I grew a full carpet without CO2 in my 12-gallon tank, it took 10 weeks instead of 6, and the carpet was slightly thinner, but it worked. The difference? I ran a Twinstar 600S delivering 85 PAR at substrate level.
EVIDENCE:
Research: Walstad, D. (2003) documented low-tech plant growth relying on adequate light
My Testing: January 2024, three 10-gallon tanks, identical substrate and fertilization
Expert Consensus: CO2 recommended but not mandatory when light exceeds 70 PAR
High light without CO2 causes algae problems unless the tank is very heavily planted from day one. Most hobbyists who tried “no CO2 Glossostigma” also used insufficient lighting, so the failures got attributed to missing CO2 rather than the actual culprit.
MYTH #2: “Any substrate works if you add root tabs”
REALITY: Glossostigma has tiny, delicate roots that struggle in coarse substrates. Root tabs help with nutrition, but grain size matters enormously for anchoring. I’ve watched newly planted portions float up repeatedly in substrates with grains larger than 2mm.
MYTH #3: “Plant the whole clump together”
REALITY: This is probably the most common technique error. Clumped Glossostigma shades itself, with outer leaves blocking light from inner portions. The result? The center dies, the clump melts, and you’re left with patchy coverage. Separating into 4-8 leaf portions is tedious, but it’s non-negotiable.
For substrate selection guidance, aquarium soil options like ADA Aquasoil work well, though I’ve also had success with Tropica Aquarium Soil and Fluval Stratum.
The Real Requirements: Parameters That Actually Matter
SPECIFICATIONS: Glossostigma elatinoides
SCIENTIFIC: Glossostigma elatinoides (Benth.) Hook.f., 1884
COMMON NAMES: Glosso, Small Mudmat, Glossostigma
PARAMETERS (Research-Based + Tested):
| Parameter | Minimum | Optimal | My Tanks |
| Temperature | 64°F (18°C) | 68-75°F (20-24°C) | 72°F worked best |
| pH | 5.0 | 6.0-7.0 | 6.5 |
| Light (PAR) | 50 | 70-100+ | 80-90 |
| CO2 | Optional* | 20-35 ppm | 25 ppm |
| GH | 2 dGH | 4-8 dGH | 6 dGH |
| KH | 1 dKH | 2-6 dKH | 4 dKH |
*CO2 optional only with 70+ PAR lighting
Here’s something I didn’t expect: Glossostigma actually prefers cooler temperatures than typical tropical setups. My fastest growth happened in an unheated tank running 68-72°F (20-22°C). When I moved portions to a 78°F tank with German Blue Rams, growth slowed noticeably. If you’re keeping tropical fish that need warmer water, like German Blue Rams or Apistogramma species, Glossostigma might not be your best carpet option.
CARE REALITY CHECK:
- Difficulty: Moderate-High (high light is mandatory)
Beginner-Suitable: No, requires understanding of light/PAR measurement- Common Failure: Insufficient lighting causing vertical growth
The lighting requirement deserves extra emphasis. You need to actually measure PAR at substrate level, not just trust the manufacturer’s tank depth claims. I bought a $40 PAR meter from Amazon (the Apogee clone models work fine for hobbyist purposes), and it was the best investment I made for planted tanks. The light I thought was delivering 80 PAR was actually hitting 45 at substrate level because of my glass lid and 16-inch water depth.
Understanding LED lighting specifications and PAR measurements completely changed my approach to planted tanks. What the manufacturer rates at “high light” often isn’t, once you account for real-world conditions.
My Test Results: 3 Tanks, 3 Methods, One Clear Winner
Glossostigma Growth Comparison
SETUP:
- Tanks: Three 10-gallon identical rimless setups
- Duration: January – April 2024 (12 weeks)
- Substrate: Tropica Aquarium Soil (all three)
- Fertilization: Tropica Specialised weekly (identical dosing)
- Starting Material: Same tissue culture batch, divided equally
VARIABLES TESTED:
| Tank | Light (PAR) | CO2 | Photo Period |
| A | 85 PAR | 25 ppm | 8 hours |
| B | 85 PAR | None | 8 hours |
| C | 42 PAR | 25 ppm | 8 hours |
RESULTS:
Tank A (High Light + CO2):
- Week 2: Visible runner extension
- Week 4: 40% substrate coverage
- Week 6: 85% coverage, carpet closed in
- Week 8: 100% dense carpet, first trim needed
- Outcome: Full success
Tank B (High Light, No CO2):
- Week 2: Minimal visible change
- Week 4: 20% substrate coverage, slight yellowing
- Week 6: 35% coverage, growth picking up
- Week 10: 80% coverage, thinner than Tank A
- Week 12: 95% carpet, acceptable density
- Outcome: Success, but slower and less dense
Tank C (Medium Light + CO2):
- Week 2: Vertical growth beginning
- Week 4: Leggy, stretched growth 2+ inches tall
- Week 6: Center portions melting
- Week 8: Patchy, unattractive growth pattern
- Outcome: FAILURE despite CO2 injection
Tank C had everything “right” according to most guides, CO2, good substrate, consistent fertilization. But 42 PAR simply wasn’t enough. The CO2 didn’t compensate for inadequate light. Meanwhile, Tank B succeeded without CO2 because light intensity was sufficient.
Light intensity is the primary variable. CO2 is a growth accelerator, not a substitute for proper lighting.
I haven’t tried Glossostigma in tanks larger than 20 gallons, where achieving high PAR at substrate level becomes significantly more expensive. My conclusions apply to nano and small tanks where intense lighting is achievable with reasonably-priced fixtures.
Step-by-Step Planting Guide: The Technique That Finally Worked
This is the method that gave me reliable results after failing twice with “just push it into the substrate” approaches.
Materials Needed:
- Glossostigma elatinoides (tissue culture preferred, cleaner, pest-free)
- Long aquascaping tweezers (curved tip works best)
- Spray bottle with dechlorinated water
- Small container of tank water for rinsing
The Process:
Step 1: Separate Into Tiny Portions
This is tedious. There’s no way around it. Take your tissue culture cup or potted Glossostigma and gently pull apart into portions containing just 4-8 leaves each. They should be roughly the size of your pinky fingernail.
Don’t skip this. I tried planting larger clumps to save time in my second attempt, they all died in the center within three weeks.
Step 2: Prepare Substrate (If Dry Start) or Lower Water Level
I’ve had better success with the dry start method for Glossostigma. Six weeks of emersed growth before flooding gives the root system time to anchor properly.
If planting in a filled tank, lower water level to 1-2 inches above substrate. This makes planting dramatically easier.
Step 3: Plant in Grid Pattern
Space your tiny portions 1-1.5 inches apart in a grid pattern. Yes, it looks sparse. That’s correct. Within 4-6 weeks, the runners will fill the gaps.
Step 4: Proper Insertion Technique
Grip each portion with tweezers at a 45-degree angle. Push into substrate about 0.5 inches deep. Release tweezers while keeping them pressed into substrate, then pull straight up. This prevents the plant from coming up with the tweezers.
Honestly, expect some portions to float up anyway. Just replant them. Mist frequently if using dry start method.
Step 5: First Two Weeks Care
Avoid disturbing substrate. If running a filled tank, temporarily reduce filter flow to prevent newly planted portions from floating. Monitor for melting, some tissue culture portions do melt back before regrowing. That’s normal.
Maintenance and Long-Term Care
Once established, Glossostigma requires regular trimming or it becomes problematic. Here’s what I’ve learned:
Trimming Schedule:
Trim every 2-3 weeks once carpet establishes. Cut straight across the top with sharp scissors, removing roughly the top third. This prevents the “pillow” effect where the carpet grows upward in mounds, with lower layers dying from light deprivation.
I use curved aquascaping scissors specifically for this, trying to trim low carpets with straight scissors is frustrating. Implementing a regular plant trimming schedule keeps carpets healthy long-term.
Fertilization:
Glossostigma is a nutrient-hungry plant. I dose Seachem Flourish comprehensive twice weekly on established carpets, plus root tabs every 2-3 months. Iron deficiency shows as yellowing new growth, if you see this, increase iron supplementation.
Common Problems:
Algae overgrowth: Usually happens with high light before the carpet establishes. Run shorter photoperiods (6 hours) initially, increasing to 8 hours once carpet covers 70%+ of substrate. For serious outbreaks, black beard algae treatments work without harming Glossostigma.
Carpet dying in patches: Often indicates debris accumulation blocking light, or root compaction in mature carpets. Thin the affected area and replant.
When Glossostigma Isn’t Right For Your Tank
Look, I love a good Glosso carpet. But it’s not the right choice for every setup.
If your lighting can’t deliver 50+ PAR at substrate level, consider alternatives. Monte Carlo (Micranthemum tweediei) grows in lower light and creates a similar aesthetic. Dwarf Hairgrass tolerates varied conditions. For the tightest, lowest carpet with even more demanding requirements, Dwarf Baby Tears (HC Cuba) is the benchmark, but it’s harder than Glossostigma, not easier.
If you’re setting up your first serious planted tank, starting with more forgiving species builds skills before tackling demanding carpeting plants.
Final Thoughts
Growing a Glossostigma carpet isn’t impossible, it just requires understanding what this plant actually needs versus what forum advice often suggests. Light intensity matters more than CO2. Planting technique matters more than substrate brand. Consistent parameters matter more than expensive equipment.
I wasted months believing CO2 was my limiting factor when my light was the problem the entire time. Once I fixed that single variable, everything clicked.
For most hobbyists, I recommend starting with a tank under 15 gallons where high PAR is achievable with fixtures under $100. Master the technique small, then scale up. And measure your PAR, don’t guess. The $40 investment in a basic meter will save you $200 in dead plants.
These recommendations come from 4+ years maintaining planted aquariums, including seven Glossostigma carpet attempts across various setups. I’ve documented successes and failures (mostly failures, initially) to help you skip the expensive learning curve I went through. For comprehensive planted tank guidance, explore our full aquatic plant collection.