I had just installed a new CO2 system, set it to the “recommended” 3 bubbles per second, and went to work. When I came home, the fish were gasping at the surface, and my drop checker was still a confusing shade of lime green. That was the day I learned that generic rules about high tech planted tank CO2 are dangerous garbage.
The truth? Counting bubbles tells you nothing about dissolved gas levels. And that little glass drop checker has a 2-hour time lag that can be fatal.
If you want the lush, pearling growth you see in contest tanks without suffocating your livestock, you have to stop guessing and start measuring. Here is the system I’ve used to balance over a dozen high-tech scapes, shifting from “hoping it works” to mathematical certainty.
The “High Tech” Definition & Why It Matters
A high tech planted tank is defined by the injection of pressurized Carbon Dioxide (CO2) to maintain stable levels between 30-45 ppm during the photoperiod. Unlike low-tech setups that rely on atmospheric equilibrium (approx. 3-5 ppm CO2), high-tech systems use a regulator, solenoid, and diffuser to force gas saturation, enabling the growth of demanding species like Hemianthus callitrichoides (HC Cuba) and red Rotalas.
A lot of beginners think “high tech” just means buying expensive lights. It doesn’t.
I’ve run tanks with $800 lights that failed miserably because the CO2 wasn’t stable. Conversely, I’ve seen stunning tanks with cheap floodlights that thrived because the CO2 levels were rock solid. If you are setting up a high tech planted tank CO2 system, understand that CO2 is the gas pedal. Light is just the fuel. If you stomp on the gas (high light) without the engine running (CO2), you crash.
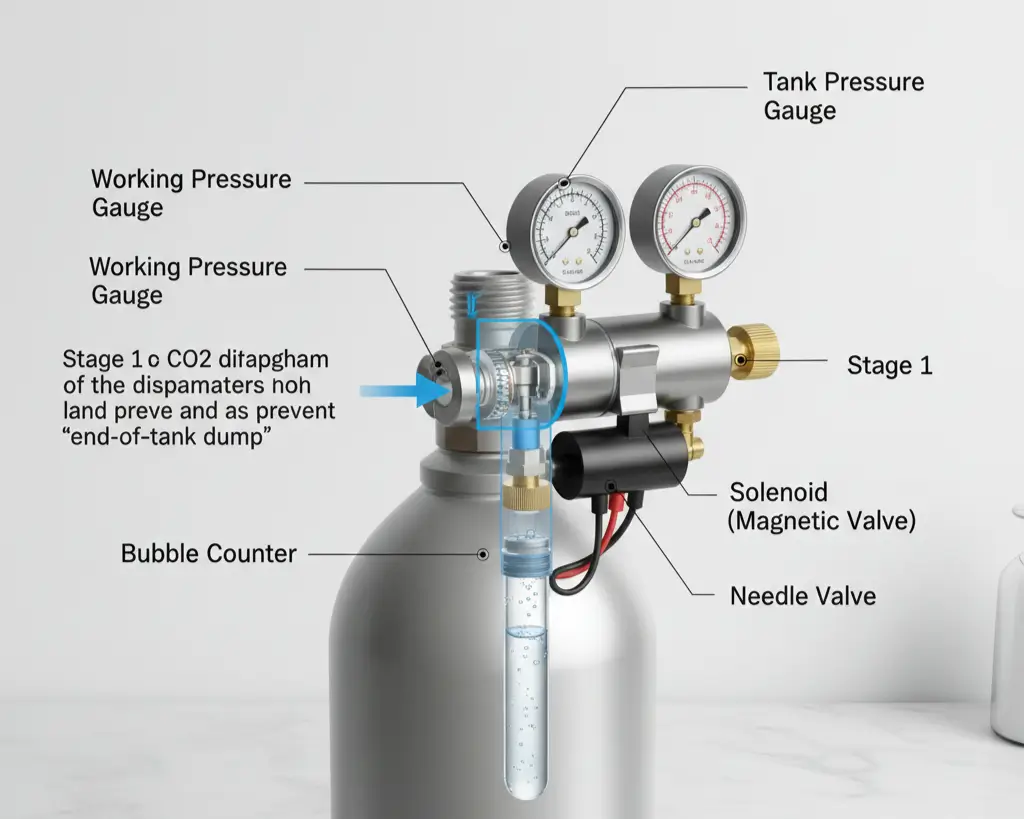
The Equipment: Don’t Cheap Out on the Regulator
I wasted about $300 on cheap, single-stage regulators in my first two years. Here’s what happens: they work fine for three months. Then, as the CO2 cylinder pressure drops near the end of the tank, the output pressure spikes.
This is called the “End of Tank Dump.”
In 2019, this phenomenon turned my 20-gallon display into a seltzer bottle overnight. I woke up to dead shrimp and a pH of 5.5.
What You Actually Need
To avoid my mistakes, look for a Dual-Stage Regulator. Not “dual gauge” (which just shows tank and working pressure), but “dual stage.” This mechanism reduces the pressure in two steps, ensuring that even as your tank runs empty, the output remains stable.
My Current Setup:
- Regulator: Dual-Stage (CO2Art or GLA Pro levels)
- Solenoid: Industrial grade (keeps it from overheating)
- Tubing: CO2-proof polyurethane (silicone leaks gas, I learned that the hard way when I lost 20% of a 5lb tank in a week).
The 1.0 pH Drop Method (The Only Metric That Matters)
Forget bubbles per second. Bubbles are different sizes depending on your bubble counter fluid and nozzle size. It’s an arbitrary unit.
The gold standard for measuring CO2 is the pH Drop Method.
pH Drop vs. Drop Checker
SETUP:
- Tank: 75 Gallon Iwagumi
- Target: 30ppm CO2
- Method: Calibrated pH Pen vs. 4dKH Drop Checker
RESULTS:
- 7:00 AM (CO2 OFF): pH 7.6 (Degassed)
- 9:00 AM (CO2 ON 2 hrs): pH 6.6
- Observation: Drop checker was still blue-green (lag time). pH pen showed full saturation.
The drop checker didn’t turn “lime green” until 11:00 AM. If I had adjusted the needle valve based on the drop checker at 9:00 AM, I would have overdosed the system.
Use a calibrated pH pen. CO2 reduces pH. A 1.0 drop in pH (from degassed state) typically equals 30ppm CO2, assuming your kH buffer isn’t fighting you too hard.
Here is the protocol I use:
- Measure Degassed pH: Take a cup of tank water, let it sit out for 24 hours (or aerate it heavily). Measure the pH. Let’s say it’s 7.5.
- Tune Your Regulator: Turn on the gas 1-2 hours before lights on.
- Measure Peak pH: Right when the lights turn on, measure the pH in the tank.
- The Goal: You want a 1.0 drop. So, if you started at 7.5, you want 6.5.
Note: If you have active substrate like ADA Aquasoil, this gets tricky because the soil also lowers pH. In that case, aim for a 1.2 to 1.3 drop to be safe, but watch your fish.
Diffusers: Dissolving the Gas
Getting bubbles into the water is easy. Getting them dissolved so plants can use them is the hard part.
| Method | Efficiency | Maintenance | My Finding |
| Ceramic Disk (In-Tank) | 60-70% | Weekly cleaning | Looks ugly, works fine for <40 gallons. |
| In-Line Diffuser | 80-90% | Monthly cleaning | The sweet spot. Creates a “sprite mist” in the tank. |
| Reactors (Rex Grigg) | 100% | Yearly cleaning | Zero bubbles in tank. Best for tanks >75 gallons. |
I ran a Rex Grigg style reactor on my 90-gallon Discus tank. It was amazing, silent, no bubbles distracting the view. But for my 20-gallon Dwarf Baby Tears carpet, I actually prefer the In-Line diffuser. Why? Because the micro-mist lands directly on the leaves, which seems to help delicate carpeting plants uptake carbon faster than fully dissolved gas alone.
RECOMMENDATION:
- Nano (<20g): In-tank Twinstar or Aquario Neo.
- Medium (20-75g): In-line diffuser on the canister filter outflow.
- Large (75g+): Reactor.
Myth vs. Reality: Surface Agitation
MYTH: “You should minimize surface agitation to keep CO2 from escaping.”
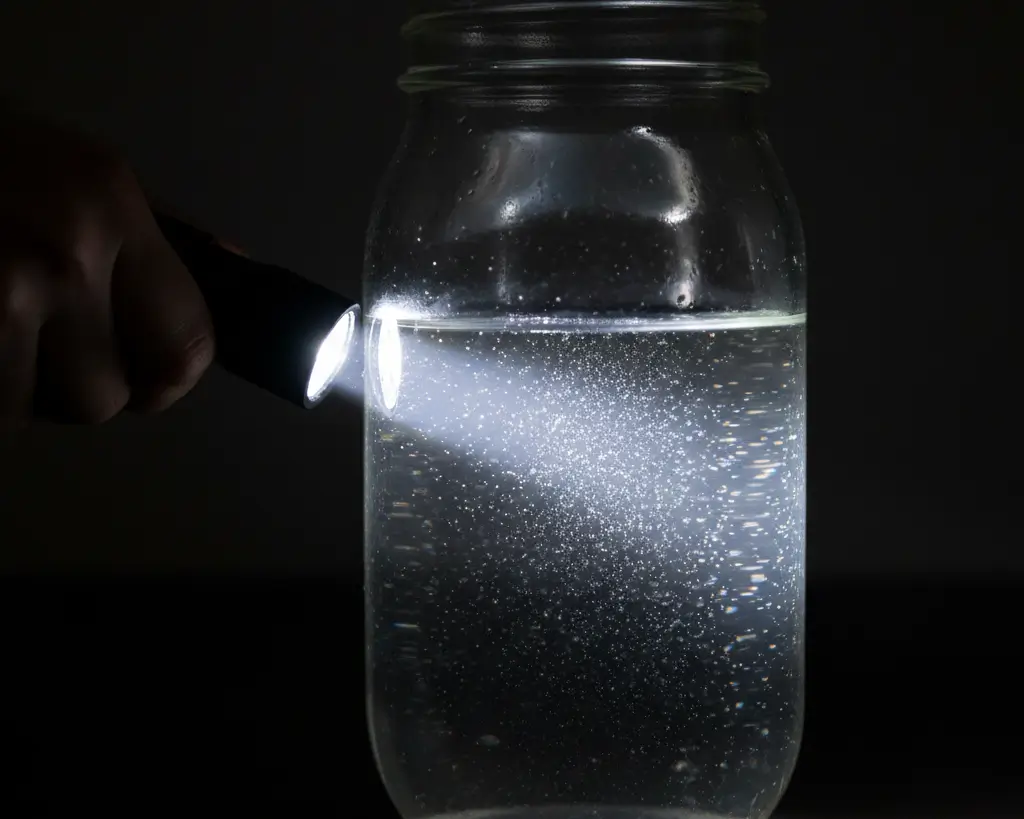
REALITY: High surface agitation allows you to inject more CO2 safely.
- Gas exchange occurs at the surface.
- On my Iwagumi stone layout, I raised the lily pipe to create a vortex. I had to increase my bubble rate by 20% to maintain the pH drop, BUT my fish showed zero stress even at 40ppm CO2.
People think CO2 acts like water in a bucket, if you shake it, it spills. In reality, O2 and CO2 operate independently. High agitation brings O2 in (good for fish) and drives CO2 out. By injecting more CO2 to compensate for the loss, you get high CO2 and high O2. This is the secret to Japanese aquascaping galleries.
Aim for a gentle ripple across the entire surface. Use a surface skimmer to remove biofilm, which blocks gas exchange.
Troubleshooting: The “Algae Farm” Phase
If you have high light and fluctuating CO2, you will grow algae better than plants. Specifically, Black Beard Algae (BBA).
I fought BBA for six months in 2020. I tried glutaraldehyde/Excel, I tried blackouts, I tried prayer. Nothing worked.
Then I looked at my flow.
My filter output was hitting the front glass and looping back, but the back corners were dead zones. The plants there were starving for CO2, leaking sugars, and triggering algae. I added a small circulation pump to sweep the CO2 mist into those corners. The BBA turned red (dying) and vanished within three weeks.
CO2 is useless if it doesn’t reach the plant. If you see your Rotala Rotundifolia stunting in one corner while growing well in another, you have a flow problem, not a light problem.
Safety Protocols (Don’t Skip This)
When dialing in high levels of CO2, you are walking a knife’s edge.
- The “Gasp” Check: When increasing CO2, do it on a day you are home. Watch the fish. If they are at the surface gasping, or if your shrimp are inactive/jumpy, turn the gas off immediately and raise the lily pipes to aerate.
- Solenoid Timer: Set your CO2 to turn on 1.5 hours before the lights, and turn off 1 hour before the lights go out. Plants don’t use CO2 in the dark; they respire O2. Leaving gas on at night is a recipe for suffocation.
- Check Valves: Use high-quality check valves. Water siphoning back into your regulator will destroy a $200 piece of equipment in seconds.
Final Thoughts: The Sweet Spot
Getting high tech CO2 right is frustrating. You will buy adapters that don’t fit. You will have a leak that empties a tank in two days (always use soapy water to check connections!).
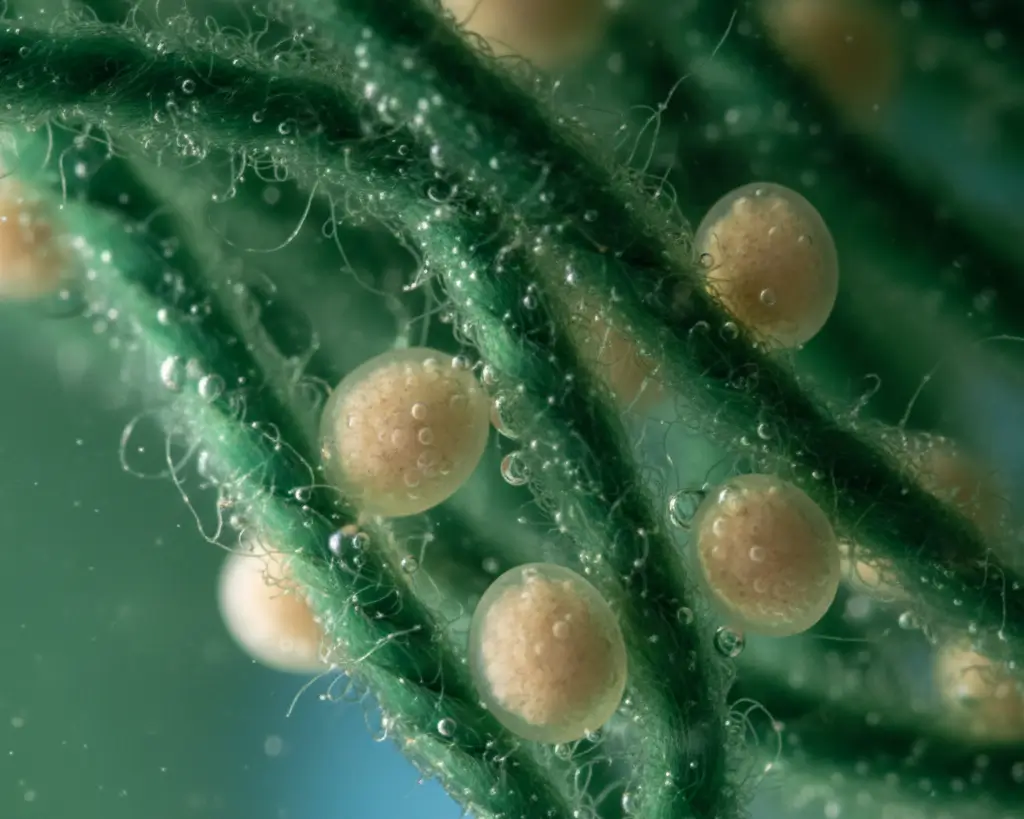
But the first time you see “pearling”, streams of oxygen bubbles releasing from your plants like champagne, it clicks. The plants aren’t just surviving; they are operating at maximum capacity.
Don’t chase a specific number. Chase that 1.0 pH drop, ensure your flow is distributing the mist everywhere, and watch your livestock. That balance is where the magic happens.