I still remember the first time I tried to build a “plant street” in my 55-gallon tank. I bought twenty pots of Lobelia cardinalis, planted them in a straight line, and waited. Six weeks later, I didn’t have a beautiful Dutch aquascape. I had a flat, boring green wall that looked like a bad hedge maze.
It took me three years, two complete tear-downs, and a lot of translation of old Dutch NBAT (Nederlandse Bond Aqua Terra) rulebooks to realize I was missing the point entirely.
A plant street isn’t just a row of plants. It is a forced-perspective optical illusion designed to trick the human eye into seeing depth where none exists. If you are struggling to get that “infinite highway” look in your tank, it’s probably not your light or your CO2, it’s your geometry.
Here is exactly how I fix flat streets, the specific trimming angles I use, and why “tapering” is the secret sauce of the Dutch style.
What Exactly is a Dutch Plant Street?
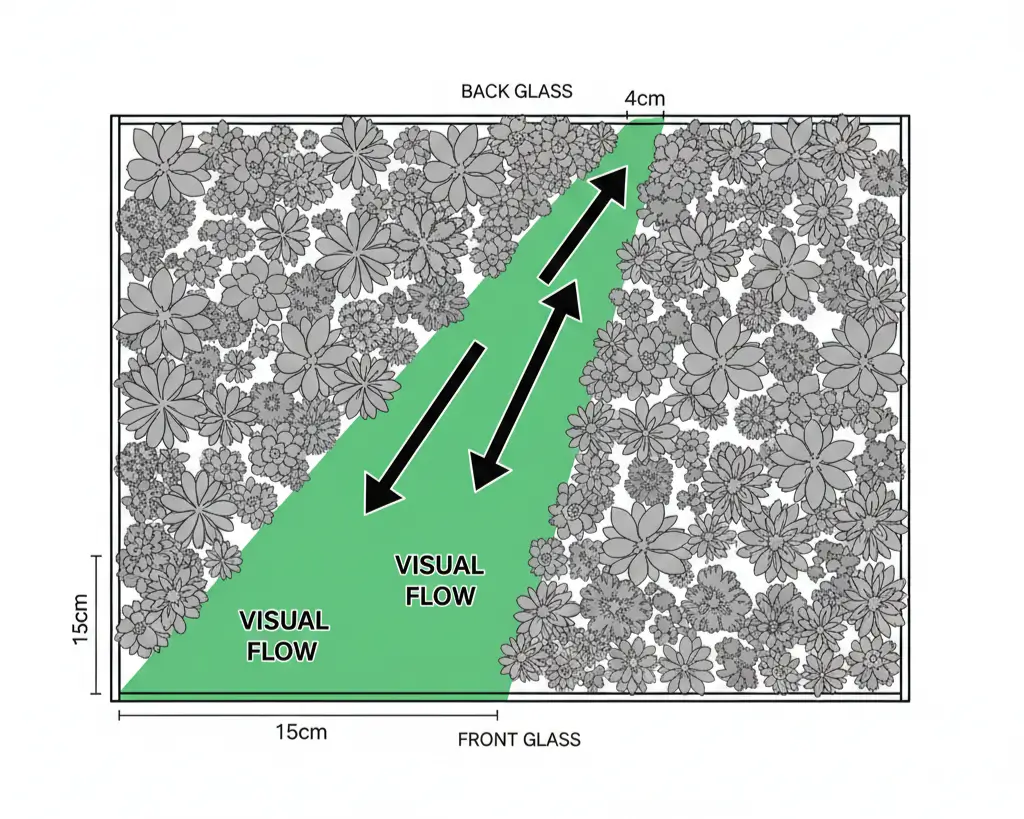
A Dutch Plant Street (often called a “Leiden Street”) is a specific grouping of aquatic plants arranged in a diagonal line that widens as it moves toward the front glass and narrows toward the back. This trapezoidal shape creates a “vanishing point” illusion, making the aquarium appear significantly deeper than it actually is. Unlike standard rows, the plants at the back are kept shorter, while the front remains lower, creating a rising slope that guides the viewer’s eye.
When I finally got this right, people stopped asking “what fish do you have?” and started asking “how deep is that tank?” That’s the goal.
At Aquatics Pool Spa, we often talk about general setup, but today I want to dissect this specific geometric trick because it’s the hardest part of the hobby to master.
The “Green Wall” Mistake: Why Most Streets Fail
I see this constantly on forums. You pick a species, you plant it in a line, and it grows straight up.
The problem? Verticality kills depth.
In 2021, I ran a test layout using Staurogyne repens as a street. I let it grow naturally. Within three weeks, the plants in the back were taller than the plants in the front due to the light intensity being slightly lower near the back glass. The result was an “inverted perspective.” It made the tank look 6 inches deep instead of 18.
The Fix: You have to fight the plant’s biology.
Stem plants want to grow up toward the light. You need them to grow out toward the viewer.
The Geometry of Tapering (My 30-Degree Rule)
This is the part that usually gets skipped in tutorials. How do you actually cut the plants to make them look deep?
I use what I call the 30-Degree Slope Rule.
The Setup
- Rear Width: The street should be 3-5cm wide at the back glass.
- Front Width: The street should be 10-15cm wide at the front/mid-ground.
- The Slope: The substrate should physically slope upward, but the plant tips must create a distinct upward angle from front to back.
However, here is the contradiction I found through testing.
MYTH vs REALITY: Plant Height
MYTH: “Plants in the back should be the tallest to show off the street.”
REALITY: If the back of your street is the highest point, you lose the vanishing point. The back of the street should actually disappear behind another plant group or hardscape, or terminate slightly lower than the surrounding groups to create a “valley” effect.
My Testing: In my 75-gallon setup, raising the rear of the Lobelia street to the water surface flattened the look. trimming it to 2/3rds height of the surrounding Rotala created a shadow gap that simulated infinite depth.
Best Plants for Streets (Tested)
Not every plant works. I wasted about $150 trying to force Rotala rotundifolia into a street in a high-flow tank. It was a disaster. It grows too fast and “weeps” over, destroying the clean lines you need.
Here is my comparison of species I’ve actually used for streets:
| Species | Growth Rate | Trimming Work | Street Suitability |
| Lobelia cardinalis | Slow/Medium | Low | Perfect (The classic) |
| Saururus cernuus | Slow | Low | Excellent (Unique leaf) |
| Staurogyne repens | Medium | High | Good (For small tanks) |
| Rotala Rotundifolia | Fast | Extreme | Poor (Too messy) |
| Ludwigia Super Red | Fast | High | Fair (Needs heavy shaping) |
“I’ve kept a Lobelia street running for 14 months with minimal replanting. Contrast that with Ludwigia, which I had to top and replant every 6 days to keep the street shape. If you have a job and a family, stick to Lobelia or Saururus.”
Choose Lobelia cardinalis if: You are a beginner to Dutch style.
Choose Ludwigia if: You need a red contrast and have time to trim twice a week.
Sources: NBAT Species List 2023 + Personal logs [2021-2023]
The “Ugly Week” Protocol: Trimming for Depth
This is where it hurts. To get a perfect street, you have to ruin your tank temporarily.
When I maintain my Dutch aquascape plant streets, I don’t just snip the tops. Snipping the tops creates branching (bifurcation), which makes the top of the street look like a messy broccoli head.
My Protocol:
- Uproot Everything: Yes, pull the whole street out.
- Select the Tips: Keep only the top 3-4 inches of the healthiest stems.
- Replant by Height: Replant the shortest stems at the front, and the tallest stems at the back.
Why do this?
It ensures the leaves are uniform size. If you just trim the tops, the front leaves get old, algae-covered, and large, while the new growth is small. This ruins the perspective. By replanting tops, every leaf looks fresh.
“I used to think ‘topping’ was enough. Then I realized my Alternanthera looked terrible at the bottom. Replanting tops is the only way to maintain the illusion of perfection.”
Contrast: The Secret Ingredient
A street doesn’t exist in a vacuum. It only looks like a street because of what is next to it.
If you plant a green Lobelia street next to a green Pearl Weed, it disappears. You need Texture and Color contrast.
In my current 40-breeder setup, I run the Lobelia street (broad, round leaf, green) flanked by Ludwigia Super Red Mini (small leaf, red). The difference in leaf texture creates a “vibrating” boundary where the eye clearly separates the groups.
The Rule of 3:
- Street species (Distinct shape)
- Left Neighbor (Different color)
- Right Neighbor (Different leaf texture)
Water Parameters for Tight Growth
You can’t have a street if your plants are “leggy” (long internodes between leaves). Leggy plants look stringy, not dense.
SPECIFICATIONS: Compact Growth Parameters
LIGHTING: High (50-80 PAR at substrate).
CO2: Mandatory for Dutch style (30ppm).
NITRATES: 10-20ppm (Keeps stems thick).
PHOSPHATES: 1-2ppm.
“When I dropped my nitrates below 5ppm trying to turn my Rotala red, my Lobelia street stalled. The lower leaves melted, and the ‘street’ became a ‘bridge’ with water flowing underneath. Keep your macros up.”
Advanced Troubleshooting: “Why does my street lean?”
This drove me crazy in 2022. I planted a perfect street, and within three days, all the tips were bending left.
It wasn’t flow. It was Phototropism.
My light fixture was slightly forward-biased. The plants were reaching for the strongest PAR source.
The Fix:
I actually tilted my LED fixture (a Chihiros WRGB II) slightly toward the back wall. This forced the plants to grow straight up or slightly back, reinforcing the visual depth. It’s a tiny adjustment, but physics wins every time.
Final Thoughts: It’s About Illusion
We aren’t just growing plants; we are painting with biology. Building a proper street is one of the most rewarding challenges in the hobby because it forces you to understand growth rates, light angles, and pruning techniques intimately.
Don’t get discouraged if your first street looks like a wall. Mine did too. Pull it up, trim the bottoms, replant the tops, and try that 30-degree angle again.
If you are looking to expand your plant palette for your next street, check out our guides on Bucephalandra varieties for dark contrast foregrounds or Anubias Nana Petite to frame the entrance of your street.