I still remember the morning I almost quit the hobby. I walked into my living room to find thirty Cardinal Tetras gasping at the surface, their gills flared red. My DIY yeast CO2 mixture had dumped overnight, turning the water acidic and toxic.
That was the day I stopped messing around with unstable mixtures and committed to a real pressurized CO2 setup complete with safety fail-safes.
High-tech planted tanks aren’t difficult because of the plants, they’re difficult because people buy the wrong equipment and tune it by guessing. If you are looking to transition from low-tech to high-tech, this guide covers the physics, the gear, and the specific tuning method I use to hit 30ppm CO2 without gassing my livestock.
What is a Complete Pressurized CO2 System?
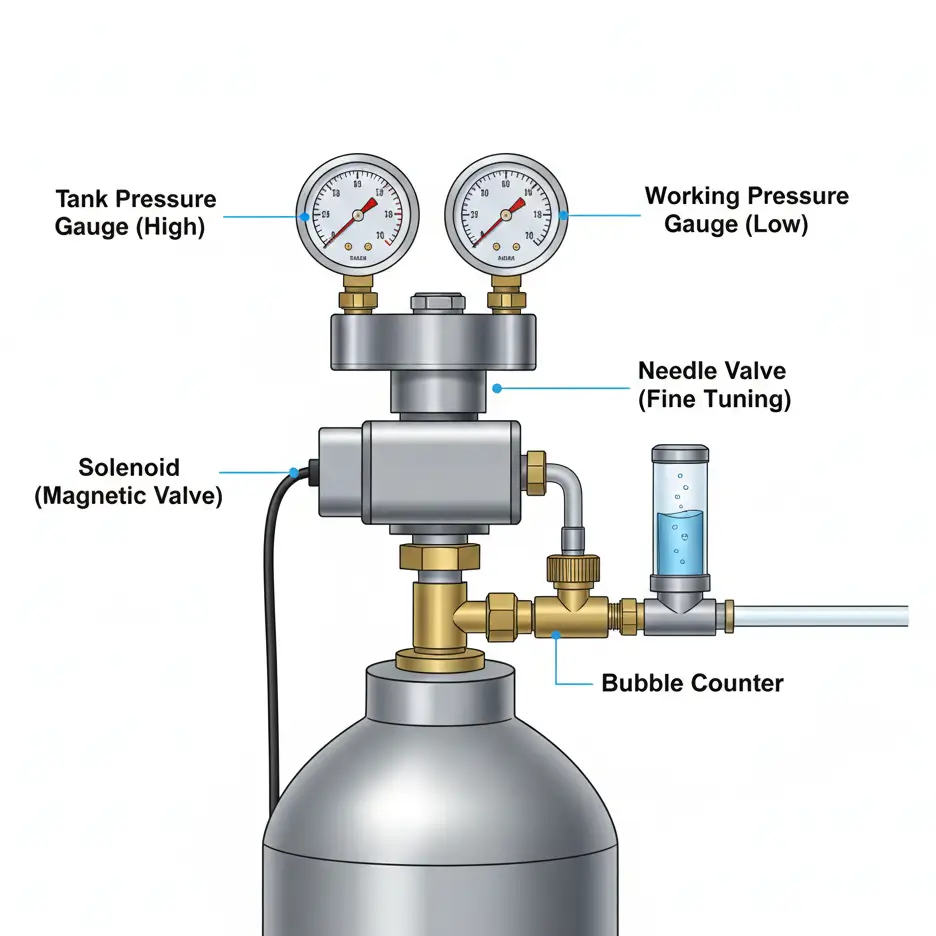
A complete pressurized CO2 system consists of four primary components working in a chain: the cylinder (gas storage), the regulator (pressure reduction), the solenoid (automation), and the diffuser (gas dissolution). Together, they inject precise amounts of carbon dioxide into the water column to accelerate photosynthesis.
But here’s what the manuals don’t tell you: the relationship between your surface agitation and your injection rate is actually more important than the brand of regulator you buy. Let’s break down the gear first.
The Hardware: Where to Spend vs. Save
I’ve wasted about $600 on “budget” regulators that drifted or leaked before I realized that buying cheap is expensive. However, you also don’t need a lab-grade system.
1. The Cylinder (The Tank)
It’s just an aluminum or steel bottle. Don’t overthink this.
- 5lb Cylinder: The gold standard for tanks 20-75 gallons. Refills cost me about $20 and last 4-6 months on my 40-gallon breeder.
- Paintball Tank: Good for nano setups, but you need an adapter.
- CGA 320 Valve: This is the standard connection for North America. If you are in Europe, you’re looking for DIN 477.
My Mistake: I bought a shiny branded cylinder online for $120. Then I went to the welding supply shop to refill it, and they just swapped it for a beat-up generic one. Save your money, buy a used tank from a welding shop or beverage supply store.
2. The Regulator (The Brain)
This is where your money goes. The regulator takes the insane 800+ PSI from the cylinder and knocks it down to a usable 30-40 PSI.
MYTH vs REALITY: Single Stage vs. Dual Stage
MYTH: “You absolutely need a dual-stage regulator or you will kill your fish.”
REALITY: A dual-stage regulator is safer, but a high-quality single-stage is fine for 90% of hobbyists.
EVIDENCE:
- The Physics: As a CO2 cylinder empties, the liquid CO2 inside evaporates. Near the end, the pressure inside the tank drops rapidly. On cheap single-stage regulators, this pressure drop can ironically cause the output pressure to spike, dumping the remaining gas into your tank. We call this the “End of Tank Dump” (EOTD).
- My Testing: I ran a high-quality single-stage (CO2Art) for 2 years. I monitored the end-of-tank pressure daily. It never dumped. Why? Because good single-stage designs have stiff diaphragms.
- The Nuance: If you can afford the extra $50, get dual-stage (two gauges, two internal chambers) for peace of mind. If you’re on a budget, get a quality single-stage, not a $30 Amazon knockoff.
3. The Needle Valve & Solenoid
The needle valve controls the bubble count. The solenoid puts it on a timer.
- Crucial Tip: You want a solenoid that runs cool. Some of the cheap ones get hot enough to burn your hand.
- Timer: Connect your solenoid to a smart plug. Set it to turn on 1 hour before your lights, and off 1 hour before your lights go out.
4. Diffuser vs. Reactor: Comparison Matrix
| Factor | Ceramic Diffuser | Inline Diffuser | CO2 Reactor | My Verdict |
| Visibility | Visible in tank | Hidden (on filter hose) | Hidden (on filter hose) | Inline is King |
| Efficiency | 60-70% | 90% | 99% | Reactor wins |
| Maintenance | Cleaning algae monthly | Cleaning every 3-6 mos | Yearly clean | Reactor wins |
| Bubble Mist | “Sprite” look | Fine mist | Zero mist | Personal pref |
I used in-tank diffusers for years. They get covered in green spot algae and look ugly. I switched to an inline diffuser on my canister filter setup and the aesthetic difference was immediate. No clutter, just plants.
Assembly: Don’t Rush This
When I first set up my pressurized CO2 setup complete, I was so excited I hooked everything up and walked away. Two days later, my 5lb tank was empty. I had a micro-leak at the stem.
The Soapy Water Test:
- Wrench tight (don’t hulk smash it, just snug).
- Mix dish soap and water in a spray bottle.
- Open the main cylinder valve.
- Spray every connection.
- If it bubbles, it’s leaking. Tighten it.
Tuning: The 1-pH Drop Method (Ignore Bubble Counts)

This is the part nobody explains well. Beginners ask, “How many bubbles per second (BPS) for a 20 gallon?”
The answer is: It doesn’t matter.
Bubble counters are just a visual reference for consistency, not a measurement of volume. A generic bubble counter might release different sized bubbles than a brand name one.
The Science of pH and KH
CO2 dissolves into water and creates carbonic acid. This lowers your pH. There is a mathematical relationship between your Carbonate Hardness (KH), your pH, and the amount of CO2 in the water (ppm).
The Target: We generally want 30ppm of dissolved CO2.
My Step-by-Step Tuning Process:
1. Establish Baseline:
Test your pH exactly when the lights come on, before CO2 has been running. Let’s say your tank rests at pH 7.4.
2. The Goal:
To hit roughly 30ppm CO2, we typically need to drop the pH by 1.0 point. So, my target is pH 6.4.
3. The Incremental Dial-in:
- Day 1: Start at 1 bubble per second. Wait 2 hours. Test pH. It’s 7.2? Not enough.
- Day 2: Increase to 2 bubbles per second. Wait 2 hours. Test pH. It’s 6.8? Getting closer.
- Day 3: Nudge it up. Test pH. 6.4? Stop.
If you have soft water (low KH, under 3 dGH), this pH swing can happen fast. Be careful. I recommend reading my notes on GH vs KH differences if you don’t know your water chemistry.
Why Your Drop Checker is Lying
You see those glass bulbs with blue/green liquid? That’s a drop checker. It changes color based on CO2 levels.
- Blue: Too little CO2.
- Green: Good (30ppm).
- Yellow: Toxic levels (>45ppm).
The Problem: There is a 1-2 hour lag time. By the time your drop checker turns yellow, your fish might already be dead. Use the drop checker as a quick visual check “at a glance,” but use the pH test for actual tuning.
Essential Maintenance (That I Often Forget)
The system isn’t “set and forget.”
- The Check Valve: This little $5 piece of plastic prevents water from siphoning out of your tank and ruining your expensive regulator. I replace mine every 6 months. Cheap insurance.
- Diffuser Cleaning: When bubbles start getting big and coming out the sides of the ceramic disk, it’s clogged. Soak it in a 50/50 bleach/water solution for 20 minutes, then soak in water with double-dose dechlorinator.
- Cylinder Swap: Keep a spare washer/O-ring. Every time you swap the tank, check the washer. If it looks cracked or dry, replace it.
Troubleshooting: Why Isn’t It Working?
Symptom: “I have CO2 running, but I still have Black Beard Algae (BBA).”
Diagnosis: Fluctuating CO2 levels. BBA loves unstable CO2. If your tank runs out of gas and goes 3 days without it, or if your flow is poor, BBA triggers.
Fix: Ensure you have good water circulation. The CO2 mist needs to reach every corner. I often add a small powerhead to push the mist around.
Symptom: “My solenoid clicks, but no bubbles come out.”
Diagnosis: Working pressure is too low.
Fix: Check the “low pressure” gauge on the regulator. It should be around 30-40 PSI. If it’s 10 PSI, it can’t push gas through the ceramic diffuser.
Can You Do High-Tech Without Pressurized CO2?
Honestly? Not really.
I messed around with “Liquid CO2” (Glutaraldehyde) for years. It’s an algaecide, not a carbon source. It helps, but it doesn’t drive growth like gas does. I also tried DIY yeast/sugar bottles. The fluctuation in output caused massive algae blooms.
If you want those lush Dwarf Baby Tears carpets or deep red Rotala coloration, pressurized is the only consistent path.
The Cost Reality Check
You don’t need to mortgage your house, but don’t expect to spend $50.
- 5lb Cylinder (Filled): $80 – $100
- Reliable Regulator (Dual Gauge): $120 – $180
- Diffuser/Tubing/Check Valve: $30 – $40
- Total: $230 – $320
It hurts upfront. I get it. But considering a DIY yeast setup costs $20/month in sugar and frustration, the ROI on a pressurized system is about 12-18 months. Plus, your tank won’t smell like a brewery.
Final Thoughts
Setting up pressurized CO2 feels like bomb defusal the first time you do it. The hissing gas, the gauges, the warnings. But once you dial in that solenoid timer and see your plants “pearling” (releasing oxygen bubbles) for the first time, you realize it’s the heartbeat of the modern planted tank.
Just remember: The gear gets the gas into the water. The tuning gets the plants to grow. Start slow, measure your pH, and watch your fish.