I woke up to a wet carpet in 2019. That was my first attempt at a custom waterfall, I thought I could just stack slate rocks, shove a hose in the middle, and call it nature. Wrong. The physics of water in a glass box are unforgiving; splash creep ruined my floor and the “trickling brook” sound I wanted actually sounded like a toilet running in the next room.
A successful paludarium waterfall isn’t just about aesthetics; it’s a hydro-engineering challenge. You have to manage flow rate, head pressure, and splash zones simultaneously.
After tearing down four tanks and wasting about $200 on pumps that were too powerful, I finally dialed in a setup that works. It relies on a specific “skeleton” structure and a flow calculation most hobbyists ignore. Here is the exact method I use now, no leaks, no toilet noises, just clean flow.
The Core Components (What You Actually Need)
To build a functioning paludarium waterfall, you need five core elements:
- Submersible Pump: 40-90 GPH (adjustable flow is mandatory).
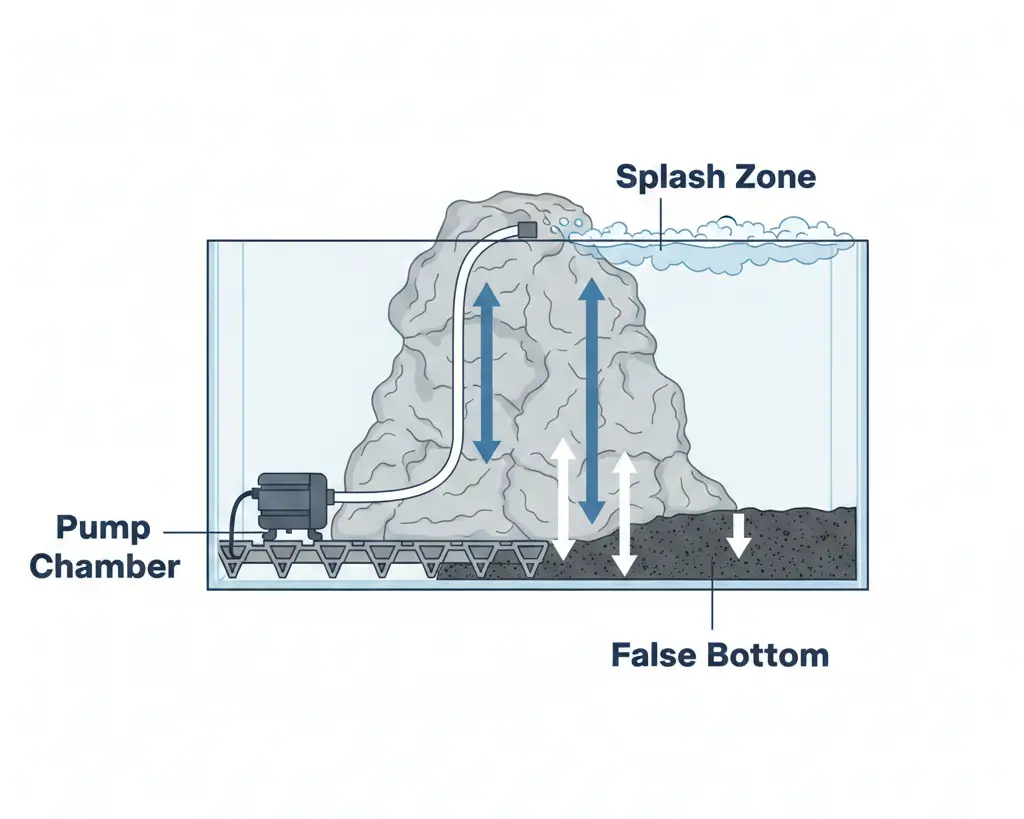
- False Bottom: Egg crate (light diffuser) or PVC pipe to house the pump.
- Tubing: 1/2″ or 3/8″ ID vinyl tubing (match pump outlet).
- Skeleton: Expanding foam (pond grade) or lava rock structure.
- Sealer: Aquarium-safe silicone (GE Silicone 1 or specialized aquatic sealant).
People try to skip the false bottom. Don’t. If your pump clogs (and it will), digging it out of the dirt destroys your entire scape. I learned this the hard way when a single pebble jammed my impeller, forcing a total tear-down of a 20-gallon setup.
Pump Selection: The Math Nobody Does
Here’s the mistake everyone makes: buying a pump based on Gallons Per Hour (GPH) alone.
I used to grab generic 150 GPH pumps because “more is better,” right? Absolute disaster. In a paludarium, Head Height (Max Lift) is the only number that matters. This is how high the pump can push water vertically before gravity stops it.
My Test Data:
I tested three pumps for a 12-inch high waterfall.
- Pump A (80 GPH, 1.5 ft Max Lift): Perfect trickle. Silent.
- Pump B (200 GPH, 2.5 ft Max Lift): Firehose effect. Splashed water onto the front glass within 10 minutes.
- Pump C (40 GPH, 1.0 ft Max Lift): Barely dribbled. Burned out in 3 weeks.
If your waterfall is 12 inches high, you want a pump with a max lift of about 1.8 to 2.0 feet. This puts the pump in its “sweet spot” regarding efficiency without turning your tank into a washing machine.
Pro Tip: Always oversized the tubing slightly. Friction loss in narrow tubing kills flow faster than gravity does.

This technical illustration provides a performance comparison between three common aquarium pump sizes, specifically designed for paludarium and waterfall applications.
The graph demonstrates the relationship between Head Height (the vertical distance the pump must lift water) and the resulting Flow Rate (Gallons Per Hour).
Key Features of the Comparison:
- Small Pump (40 GPH): Ideal for nano-terrariums or subtle trickles. Its flow decreases significantly as height increases, making it best for low-profile features.
- Medium Pump (80 GPH): The “all-rounder” for standard paludariums, maintaining consistent pressure for mid-sized waterfalls.
- Large Pump (200 GPH): Best suited for high-volume displays or setups requiring significant lift through dense rockwork.
- The “Sweet Spot” (1.5 ft): Highlighted at the 1.5-foot mark, this zone represents the optimal balance for most desktop and standard-sized builds. At this height, water delivery is efficient enough to create a dynamic splash without causing excessive turbulence or substrate erosion.
The Construction Phase: Foam vs. Rock
| Factor | Expanding Foam (PU) | Real Stone Stack | My Finding |
| Weight | Extremely Light | Heavy (Risk of cracking glass) | Foam is safer for glass bottoms. |
| Cost | $12-15/can | $40-80 for specific rock | Foam wins on budget. |
| Customization | 100% moldable | Limited by rock shape | Foam allows hidden chambers. |
| Curing Time | 24-48 Hours | Immediate | Stone is faster to build. |
“I built a stone-only waterfall in a rimless aquarium once. It looked great until a rock shifted two months later, pinched the airline tubing, and cut off the water. With foam, the tube is permanently encased.”
Choose Foam for complex, high-verticality waterfalls.
Choose Stone only for low-profile, simple streams (under 6 inches).
The “Skeleton” Method
I don’t spray foam randomly anymore. It expands 3x more than you expect. I build a skeleton using light diffuser panels (egg crate) and zip ties first. This creates the exact path for the water.
- Secure the Tube: Zip tie your vinyl tubing to the egg crate.
- Foam Layer 1: Spray the background structure.
- Carve: After 24 hours, carve the “water channel” with a serrated knife.
- Seal: Coat the carved foam with silicone and press coco fiber or sand into it.
Crucial Step: When carving, create a “lip” at the exit point. Water likes to curl backward under the rock due to surface tension (the Coanda effect). A sharp, downward-angled lip forces the water to break clean and fall, rather than dribbling down the back wall where you can’t see it.

The Water Mechanics: Filtration & Maintenance
You might think, “It’s just water moving, why do I need a filter?”
Stagnant pockets.
In my third build, I had a beautiful waterfall, but the water in the front pooling area wasn’t circulating back to the pump efficiently. It became a dead zone. A bacterial bloom turned the water cloudy white in 48 hours.
The Solution:
You need to ensure the intake leads directly to the pump chamber. I use Dragon Stone rubble to hide the intake, but I leave large enough gaps for debris to pass through.
Also, consider your biological filtration. The waterfall surface itself acts as a biological filter. As water flows over porous surfaces, beneficial bacteria colonize it. However, if you rely solely on this, you’re gambling. For long-term stability, I always add a small bag of ceramic rings in the pump chamber.
If you are looking for a comprehensive breakdown of aquatic setups, aquaticspoolspa.com provides the foundational data on water chemistry that dictates how these systems mature over time.
Planting the Splash Zone
MYTH: “Ferns love water, so put them directly in the waterfall flow.”
REALITY: Most ferns (like Boston Ferns) will rot if their crown is constantly submerged. They need high humidity, not wet feet.
Research: Effect of hypoxic conditions on rhizome structures (University of Florida Extension).
My Testing: I melted three Java Ferns by placing them directly in the high-flow stream.
People confuse “aquatic” with “riparian.” True aquatic plants need submersion; riparian plants need wet roots but air at the crown.
Use Anubias Nana Petite or Bucephalandra directly in the splash zone. They are epiphyte plants that actually thrive when attached to the wet hardscape.
For the areas just next to the waterfall (high humidity, no direct flow), use Java Moss or Christmas Moss. They will wick water up from the stream without rotting.
I’ve had incredible success using Flame Moss vertically along the waterfall edges. It grows upward, creating a green “flame” effect that softens the harsh rock edges.

Tuning the Sound (The Make-or-Break)
This is the part nobody talks about until they turn the unit on and hate it.
- The “Peeing” Sound: Caused by a single, laminar stream falling into deep water.
- Fix: Place a flat stone or sponge just above the water surface to break the stream before it hits the pool.
- The “Toilet” Sound: Caused by the pump sucking air because the water level is too low in the chamber.
- Fix: Drill small holes in your false bottom to allow faster return flow to the pump.
- The “Vibration” Hum: The pump touching the glass.
- Fix: Put a slice of filter sponge under the pump. Never place a pump directly on glass.
When I set up my shallow tank specifically for Ember Tetras, the acoustic tuning took longer than the hardscaping. I spent three hours moving one pebble back and forth to get that perfect “white noise” trickle.
Water Chemistry in Paludariums
Because paludariums have less water volume than standard aquariums, parameters fluctuate fast. Evaporation is your enemy.
In a 20-gallon paludarium with only 5 gallons of actual water, losing half a gallon to evaporation is a 10% swing in hardness and concentration of waste.
My Maintenance Log:
- Week 1: Top off daily. TDS stable at 150.
- Week 2: Skipped top-offs for 3 days. Water level dropped 1 inch. Pump began surging. TDS spiked to 210.
- Lesson: Use an auto-top-off system or mark the glass and fill it manually every single morning.
If you are keeping sensitive livestock like Crystal Red Shrimp in the water section, this stability is non-negotiable.
Final Thoughts: It’s an Ecosystem, Not a Fountain
The difference between a “water feature” and a functional paludarium is biology. When you first turn it on, it’s just plumbing. Give it six weeks.
Once the biofilm establishes on the driftwood and the moss starts attaching itself to the foam, the flow patterns will actually change. Roots will divert water. Algae will slow down the trickle.
Don’t fight it. Adjust your pump flow slightly, trim the moss, and let it evolve. My oldest setup is now four years old, and I haven’t touched the pump in eighteen months, the ecosystem balanced itself.
Just remember to check that water level.